


10 min read
Locking pages and tables
Prevent unexpected changes in tables and pages of your doc with table and page locking.

Locking is only available on a Team or Enterprise plan.

What's covered:
- When to use locking
- Introduction to page and table locking
- When to use page locking vs. table locking
- An example scenario
- How locking interacts with sharing and roles
- Where to find the locking settings
When to use locking
Superhuman Docs often store important information and data, and leaving that data unprotected can be risky. Sharing permissions help prevent unexpected changes, but using view-only or commenting permissions may limit interaction within your doc, which isn’t ideal. Locking lets you set granular guardrails to prevent unexpected changes, making it easier for users to interact with your doc. The guesswork is taken out for them: they know what they can and cannot do because of locking. Locking limits the edits that can be made in Superhuman Docs; however, it does not limit every channel for engaging with a doc, such as the Superhuman Docs APIs, and should not be treated as a security feature.Benefits of locking:
Usability: Locking adds friction where needed. It makes it harder for users to edit or update things accidentally. Scaling Superhuman Docs: Many new users worry about breaking their docs. With locking guardrails in place, you can share information freely with less worry. Protecting your table settings and data: Because column options, in addition to table data and entries, can be locked down via table locking, you’ll prevent your users from changing formulas, column displays, or accidentally adding AI to a 10,000-row table. This will help keep your doc running smoothly and your data presented as you intended. Granular protection: Page locking can protect the rest of your doc and establish additional permissions beyond our basic sharing permissions. Locking is not intended to be a permission or security feature. Instead, it provides friction to hopefully prevent unwanted changes.How does locking work?
There are two levels of locking: page and table.Page locking
Page locking applies to a specific page within a doc, while table locking prevents unexpected changes in tables and views across an entire doc.
- Interact only: Toggle on and off the various activities editors should be able to perform without needing the ability to unlock the doc.
- Read-only: Users with read-only permissions cannot make changes to the page or see the formulas or other table settings.
Table locking
With table locking, Doc Makers can restrict managing columns and prevent collaborators from adding, deleting, or editing table data. This will keep tables and views locked, regardless of the page the table is on.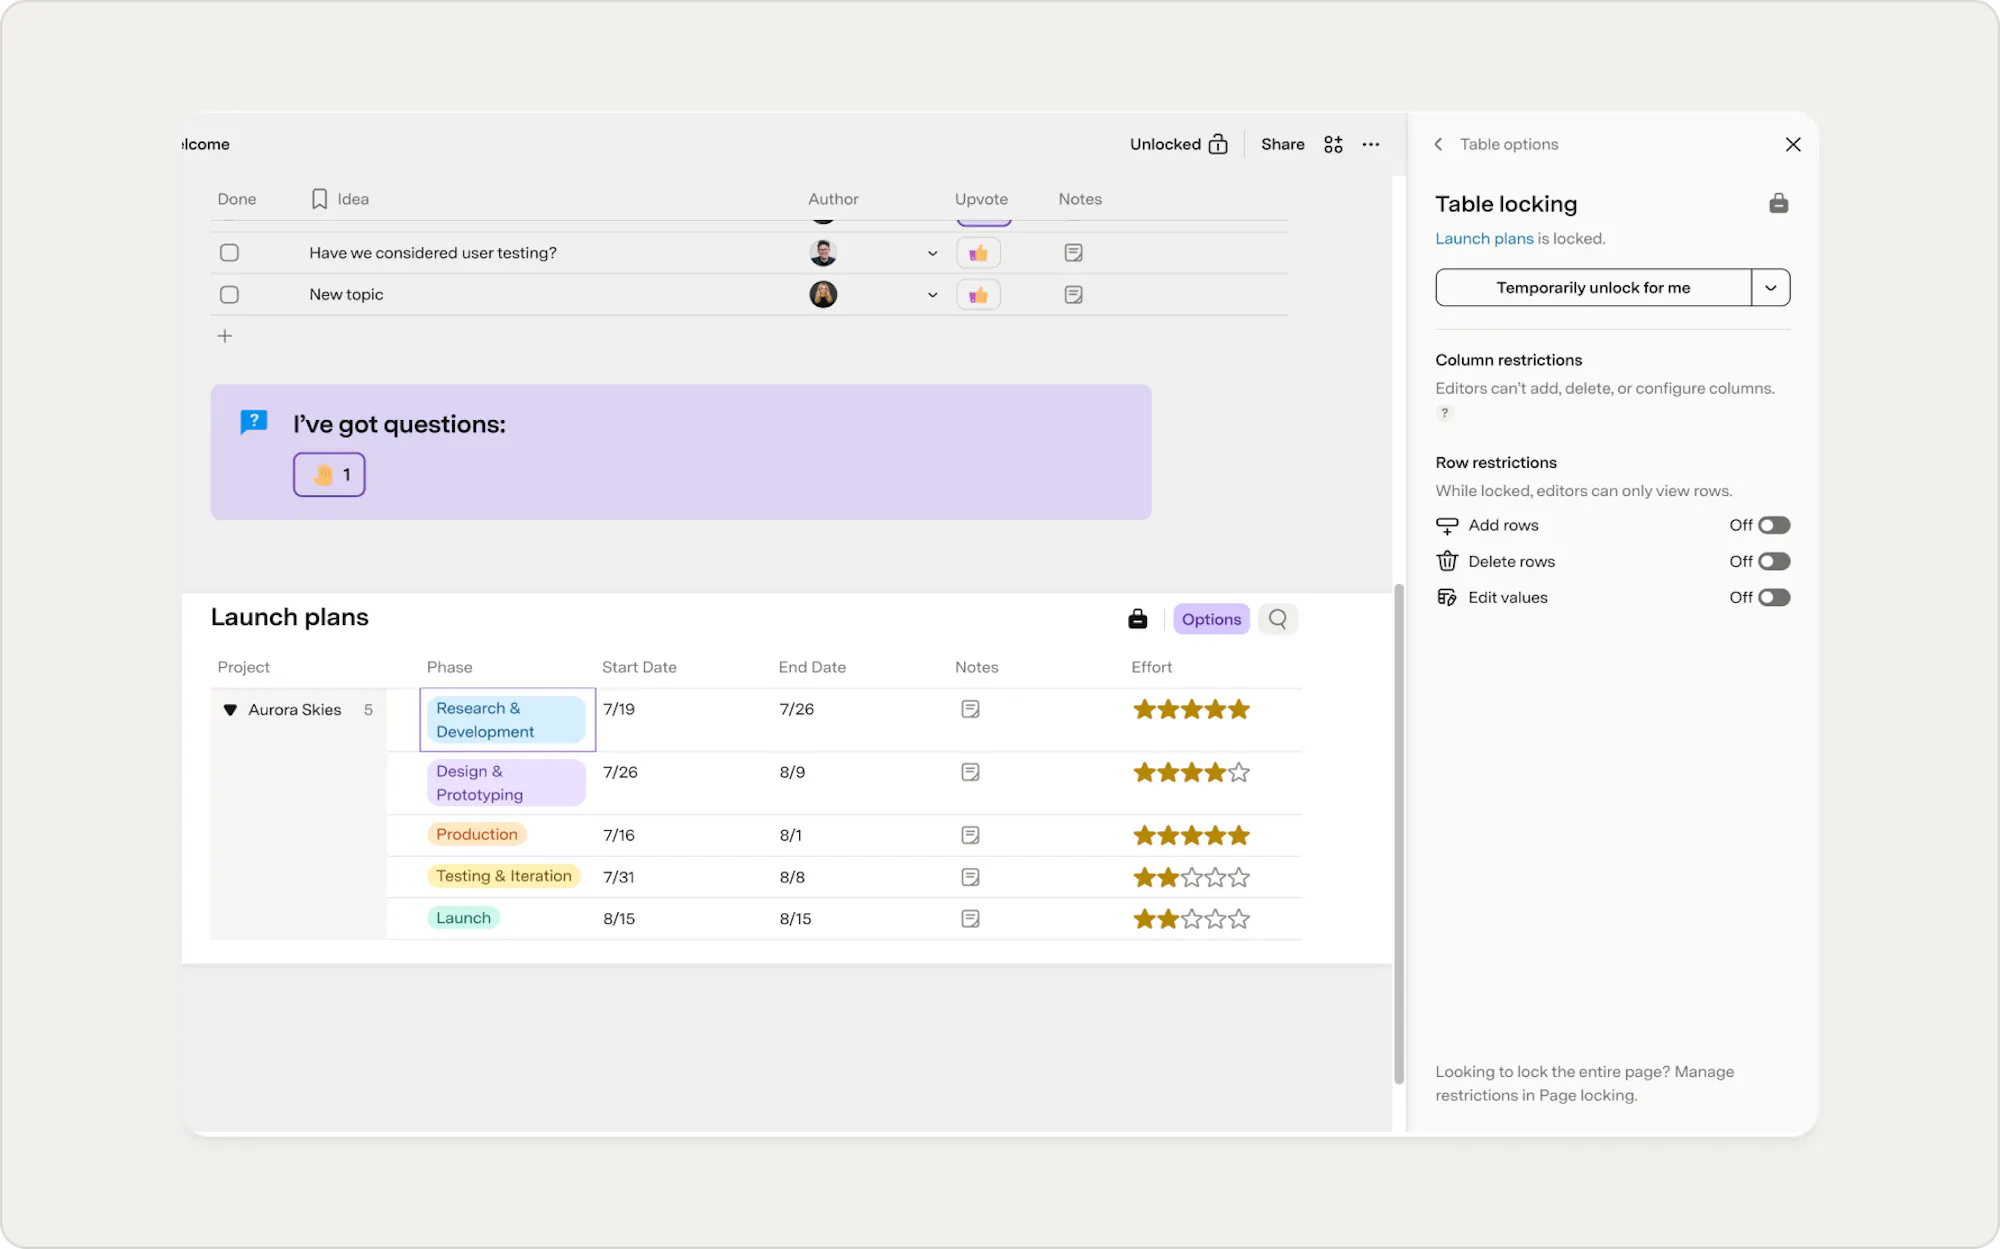
What do users see?
When either locking is turned on, all users will see a small lock symbol either on the page or table that is locked, and their actions will be limited to the settings enabled. They can click on the locking symbol to unlock the doc to take actions that had previously been limited due to locking, or you can limit unlocking with doc admin(s). More on that below.

Not sure which one to use?
Reach out to Superhuman Support if you need help deciding which model is best for you.
An example scenario
You’ve got a doc where you need your team to interact with some parts, but not others. Because of that, you set the sharing to 'edit' and decide to utilize page and table locking.On this page:
- Users should be able to click on a reaction.
- Users can add their feedback to a row in a table.
- Users shouldn't edit the text within the doc or adjust the table and views that house all your launch plans.
Page locking:
We have page locking enabled to restrict all users to only be able to interact with the doc. They can use buttons, controls, and forms, and also add, edit, and delete rows that they have created.Table locking:
Adding table locking on the launch plan table prevents anyone from adding content or editing it. But they could still use a filter bar, press buttons related to a table, or interact with table reactions.How locking interacts with sharing and roles
What someone can do inside a doc depends on a number of factors:
- Your role in Superhuman Docs dictates what can be done in any doc within the workspace and if you can create docs/pages from scratch.
- What access do you have to a specific doc or folder? No matter your role, if you aren’t granted view-only access to someone else's doc, even if you are a Maker, the doc is essentially read-only.
- If locking has been turned on, even if you have editing access to a doc, you may not be able to take the full range of actions because the doc is locked.
- Page locking supersedes table locking. If a page is locked, everything on the page is locked, including any tables.
Factors that impact doc abilities

Where to find locking settings in a doc
Page locking
To apply locking to a particular page, access the Settings panel at the top of your Superhuman Docs. Select Page Locking to view options for managing the page, default settings, and unlocking. Learn more about locking pages within your doc.Table locking
To apply table locking, click the Options button on your table and select Table locking. In this window, you'll be able to turn on locking the table and its views and customize it to allow collaborators to add/edit/delete rows they created, delete any rows, or edit any values. Learn about table locking.Unlocking
By default, anyone with Edit access can unlock a page or table by clicking on the small lock symbol. To limit access to unlocking abilities to specific people, go to the control panel at the top of your Superhuman Docs and select the Document settings icon. Select Page locking, then navigate to Unlocking, and add their name under Who can unlock. These are called Doc Admins. If the doc has been assigned Doc Admins, only these Doc Admins will be able to add or edit table locking.Now what?
Locking in Superhuman Docs helps you protect your docs while still letting everyone collaborate effectively. Knowing when to use page or table locking helps you give the right access to your team, keeping your data intact and things running smoothly. Whether you’re expanding your use of Superhuman Docs or just want to protect important info, these locking tools offer the flexibility and peace of mind you need. If you need any help or have questions, feel free to contact Superhuman Support.Was this helpful?
YesNo